
Sign PDF
Signing Documents
This module allows users to digitally sign any PDF file.
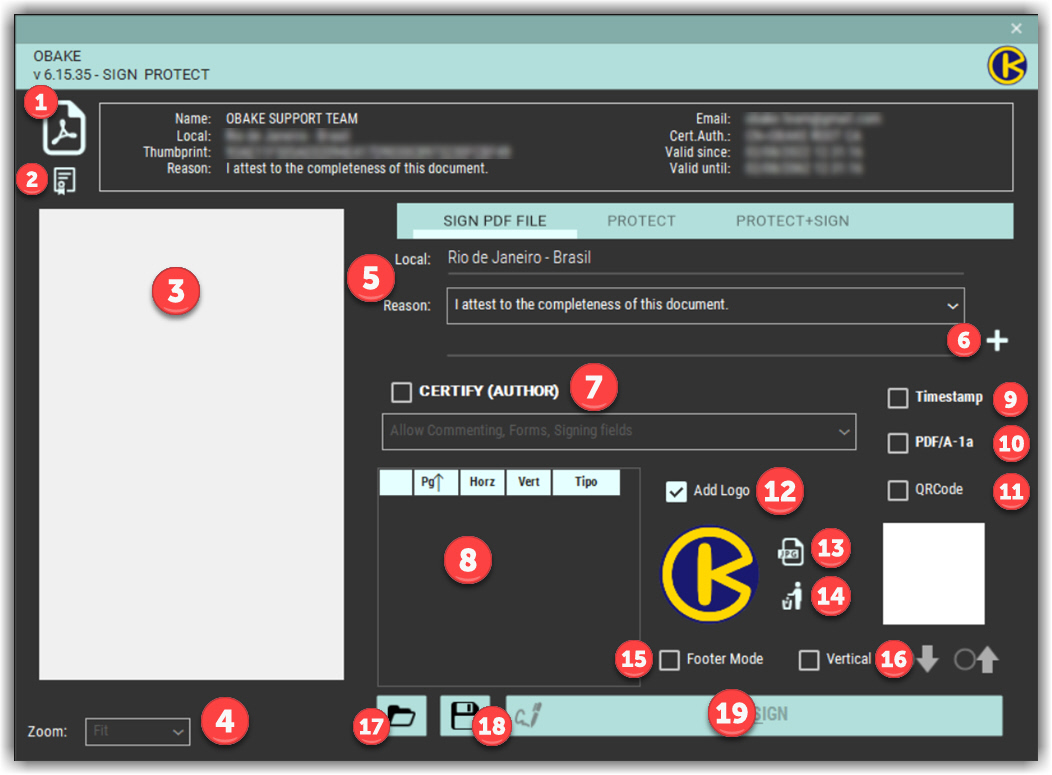
- LOAD PDF DOCUMENT: click here to load from disk any PDF file to be signed or protected.
- CERTIFICATE: OBAKE allows users to have multiples certificates, using them conveniently. Here the user can load another certificate specifically utilized to SIGN/PROTECT PDF documents, and different those used for encrypting data and files. Click this button to select the most convenient certificate from the OBAKE list (the certificates informed through the SETUP module)
- DOCUMENT AREA: this area is where users view the document and DEFINE THE SIGNATURE(s) PAGE AND POSITION. The selected position(s) will appear as rows in the SIGNATURES GRID (item 8) at the X/Y axis, defined as HORZ and VERT. To define a signature page and position, user must click with the mouse right button.
- ZOOM CONTROL: use it to set the best view size for your document in the DOCUMENT AREA. You can choose among several options, like FIT, WIDTH, HEIGHT, and various percentage options for better viewing.
- LOCAL AND REASON: by default, whenever someone signs a document, they must indicate the LOCAL/PLACE and the REASON for signing it. These fields are useful for cataloging documents in electronic format and you should use them according to your needs.
- ADD REASON: click this button to add custom "reasons" as desired.
- CERTIFY DOCUMENT: this option is generally used when the document cannot have another digital signature or if the signed document must allow some changes without invalidating the attached digital signature. Once selected, a combo of options will be available to users to define the behavior after the signing the document.
- SIGNATURES GRID: this grid shows all signatures placed in document, by PAGE (PG), HORIZONTAL POSITION (Horz), VERTICAL POSITION (Vert) and TYPE (Signature Types - see below). Users can change any of these parameters directly on grid: just double click over the respective column to change its value. Users can also DELETE ANY SIGNATURE selecting the respective row (the arrow at leftmost) and pressing the DEL key.
It is easy to read this grid: it shows the signature type (TYPE) placed on the page (PG) at position X (HORZ) and Y (VERT).
Signatures can be attached to document in some different layouts and the GRID shows them in the TYPE column, as below:
- T = TEXT: the signature is the FULL-SIZED TEXT-ONLY type. This is the default OBAKE mode. See ➌ in the sample below.
- TL = TEXT+LOGO: the signature will be the FULL-SIZED TEXT with your LOGO (or the OBAKE default) placed at its left. See ➍ in the sample below.
- Q = QRCODE. The signature will be a QR-CODE. It is the same as setting the control 11. See ➐ in the sample below.
- QL = QRCODE + LOGO: the signature will be QR-CODE with your LOGO (or the OBAKE default) placed at its left. It is the same as setting controls 11 and 12. See ➑ in the sample below.
- M = FOOTER: the signature will be in Footer Mode. It is the same as setting controls 15. See ➎ in the sample below.
- ML= FOOTER + LOGO: signature ni Footer Mode with your LOGO (or the OBAKE default) placed at its left. It is the same as setting controls 12 and 15. See ➏ in the sample below.
- B = VERTICAL/BOTTOM-TOP: the signature will be vertically aligned from the page bottom to top. It is the same as setting controls 16. See ➒ in the sample below.
- BL = VERTICAL/BOTTOM-TOP + LOGO. the signature will be vertically aligned from the page bottom to top, with your LOGO (or the OBAKE default) placed at its left. It is the same as setting controls 12 and 16. See ➓ in the sample below.
- C = VERTICAL/TOP-BOTTOM: the signature will be vertically aligned from the page top to bottom. It is the same as setting controls 16. See ➊ in the sample below.
- CL = VERTICAL/BOTTOM-TOP + LOGO. the signature will be vertically aligned from the page top to bottom, with your LOGO (or the OBAKE default) placed at its left. It is the same as setting controls 12 and 16. See ➋ in the sample below.
- TIMESTAMP: if selected, any signature present in the document will be marked with an OFFICIAL AND LEGAL DATE and TIME stamp, provided by specific Authority servers and used to legally certify signature. The chosen TIMESTAMP server can be changed in the SETUP module. NOTE: this requires an internet connection to performs.
- PDFA/1a: if selected, will create a signed document "for long term" archiving. Documents that must remains useful and valid after many years ahead are eligible to this "long term" scheme. To understand more about Long-Term PDF Documents see this link.
- QR-CODE: is enabled; the signature will only be placed as a QR-CODE. In addition, this signature supports a LOGO (see topics 12, 13, and 14).
- LOGO: if enabled, a logo will be added to the left of the selected signature. Normally, the logo is the same as OBAKE, but users can change it by pressing the button indicated by the number 13.
- CUSTOM LOGO: press this button to indicate a custom logo (e.g.: your company logo). Try images with good resolution (PNG or JPG above 95% quality) with a minimum of 96x96 pixels, 32 bits of color space.
- CLEAR CUSTOM LOGO: if pressed, your selected custom logo will be discarded, and the OBAKE logo will be set as the default.
- FOOTER TYPE: this signature is a TINY TEXT, mostly suited to be positioned in the page footer or header.
- VERTICAL TYPE: this signature is similar to the FOOTER one, but set vertically. Users can choose two different orientations for it: top-bottom or bottom-top modes.
- LOAD SETTINGS: this button loads a saved settings file (see the topic below).
- SAVE SETTINGS: all the settings above, including the signature(s), position(s), and type(s), can be saved in a settings file to easier reuse in different documents. Users can save as many settings files as they want. Users must press LOAD SETTINGS above to reuse settings saved here.
- SIGN: this is the command users must use to TEST and/or SIGN any document. This can be pressed to review signature's settings and it can be performed as much as needed, anytime.
Sample of All Types of Signatures
See here in the SIGNATURES GRID the all types below. You may also find them between topics 11-16 above.
